
Meetup tutorial intro to GatsbyJS static generator
Following this tutorial requires having node version 14.19.2 or higher installed.
Check if Node is installed.
node -vThere are many ways to install Node if you do not have it.
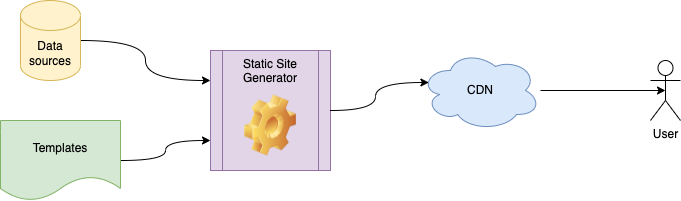
brew install nodechoco install nodejsThe most simplistic way to think of Static Site Generators are tools that generate every website page as part of a build process. Generated pages are typically deployed on Content Delivery Networks (CDNs). No server is required.
How Many Static Site Generators? A curlated list
At this point, you are thinking, “That’s great for the simplest of sites. Any modern site is dynamic.”
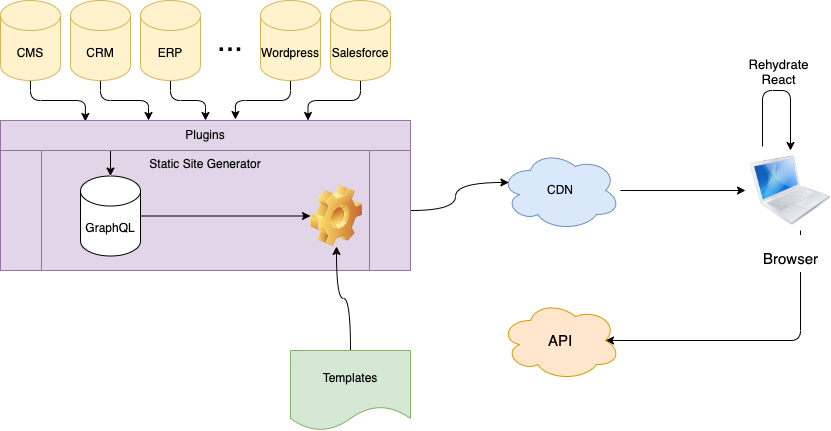
However, the static site can include javascript to provide dynamic features. As an example, the GatsbyJS architecture looks more like this.
Let’s get GatsbyJS set up. The GastbyJS documentation is here
Install the GatsbyCLI and verify the installation.
npm install -g gatsby-cli
gatsby --version
gatsby --helpOpen a terminal and change the directory to the folder where you want to create your project. Then run this.
gatsby new not-so-static-site
cd not-so-static-site
gatsby develop
You did it! 🎉🎉🎉
See what you built.
open http://localhost:8000/Explore data sources here.
open http://localhost:8000/___graphqlFor this tutorial, we will use Markdown files as our data source. GatsbyJS supports multiple data sources, merging them into a single GraphQL schema. For most data sources, there are existing plugins. Custom plugins can be written with some Node code.
npm install gatsby-transformer-remarkNow edit gatsby-config.js. Adding the gatsby-source-filesystem stanza telling Gatsby where to find our Markdown files. Then, add the gatsby-transformer-remark plugin to transform the Markdown into the GraphQL schema.
...{
    resolve: `gatsby-source-filesystem`,
    options: {
        name: `images`,
        path: `${__dirname}/src/images`,
    }
}, {
    resolve: `gatsby-source-filesystem`,
    options: {
        name: `markdown-pages`,
        path: `${__dirname}/src/markdown-pages`,
    }
},
`gatsby-transformer-remark`,
...
Now add a Markdown file src/markdown-pages/first-post.md
---
slug: "/blog/first-post"
date: "2019-05-04"
title: "My first blog post"
---

<h2>Hello World</h2>
<p>This is my first blog post.</p>
Start Gatsby and inspect the schema
gatsby develop
open http://localhost:8000/___graphql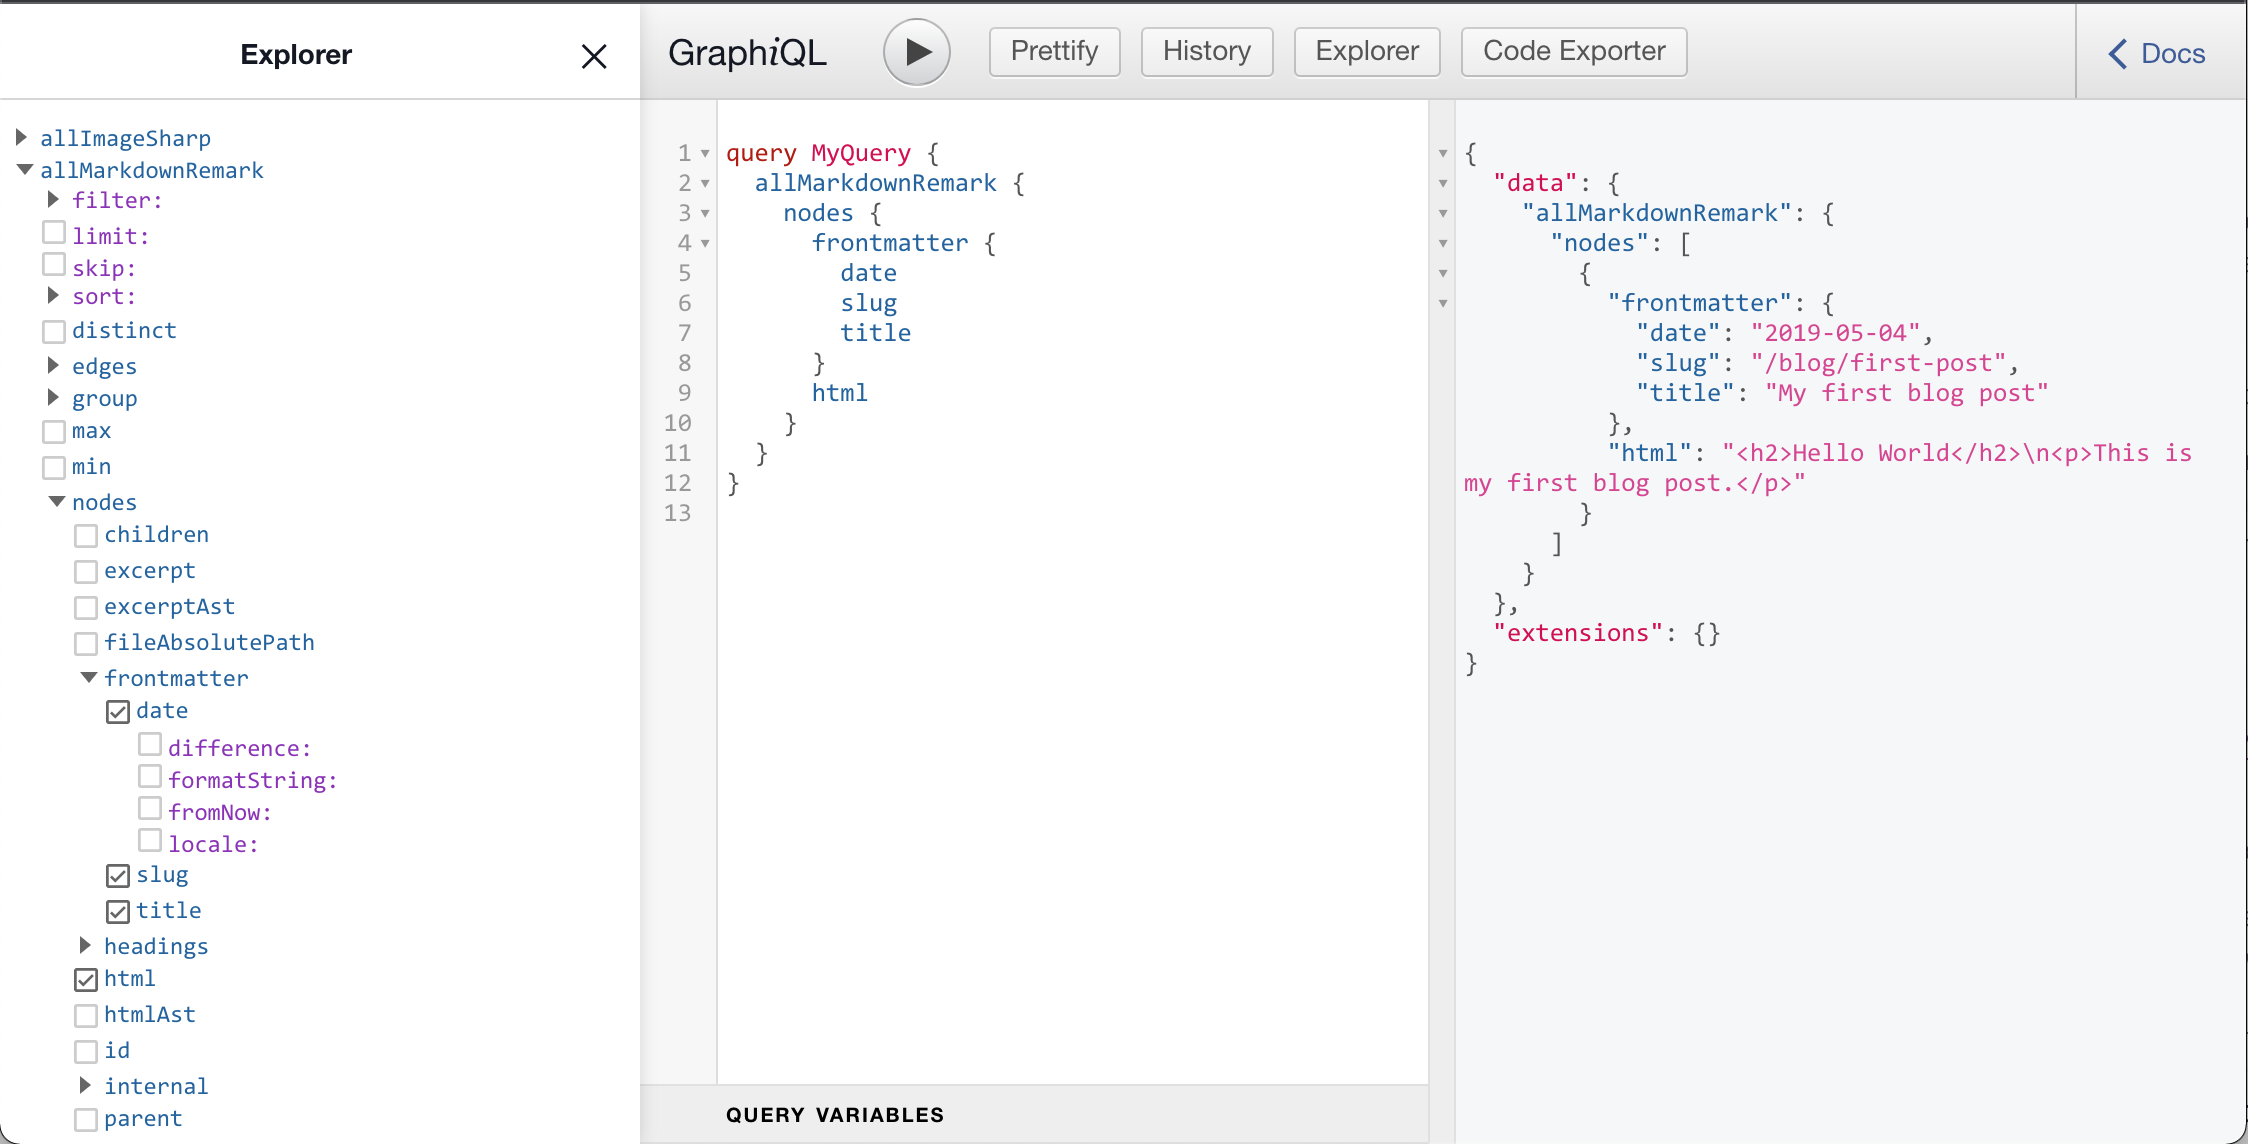
Let’s wrap this up by creating a template to render the blog post. Create a new file src/pages/{MarkdownRemark.frontmatter__slug}.js
import React from "react";
import { graphql } from "gatsby";

export default function Template({
  data, // this prop will be injected by the GraphQL query below.
}) {
  const { markdownRemark } = data; // data.markdownRemark holds your post data
  const { frontmatter, html } = markdownRemark;
  return (
    <div class="blog-post-container">
      <div class="blog-post">
        <h1>{frontmatter.title}</h1>
        <h2>{frontmatter.date}</h2>
        <div
          class="blog-post-content"
          dangerouslySetInnerHTML={{ __html: html }}
        />
      </div>
    </div>
  );
}

export const pageQuery = graphql`
  query($id: String!) {
    markdownRemark(id: { eq: $id }) {
      html
      frontmatter {
        date(formatString: "MMMM DD, YYYY")
        slug
        title
      }
    }
  }
`;
Restart the app to see your page.
gatsby develop
open http://localhost:8000/blog/first-post/
You’re your own here. I’m sure you can do it. 🥇
Now let’s make the page dynamic. I will use this Cat Fact API.
curl https://catfact.ninja/factEdit src/pages/{MarkdownRemark.frontmatter__slug} Adding useState (to store the Cat Fact), useEffect (to fetch the Cat Fact), and add the Cat Fact to the page.
// src/pages/{MarkdownRemark.frontmatter__slug}

import React from "react";
import { graphql } from "gatsby";
export default function Template({
  data, // this prop will be injected by the GraphQL query below.
}) {
  const [catFact, setCatFact] = React.useState();
  React.useEffect(() => {
    async function fetchCatFacts() {
      const result = await fetch("https://catfact.ninja/fact");
      const data = await result.json();
      setCatFact(data.fact);
    }
    fetchCatFacts();
  }, []);
  const { markdownRemark } = data; // data.markdownRemark holds your post data
  const { frontmatter, html } = markdownRemark;
  return (
    <div class="blog-post-container">
      <div class="blog-post">
        <h1>{frontmatter.title}</h1>
        <h2>{frontmatter.date}</h2>
        <p>
          <b>Cat Fact:</b>
          <i> {catFact}</i>
        </p>
        <div
          class="blog-post-content"
          dangerouslySetInnerHTML={{ __html: html }}
        />
      </div>
    </div>
  );
}
export const pageQuery = graphql`
  query($id: String!) {
    markdownRemark(id: { eq: $id }) {
      html
      frontmatter {
        date(formatString: "MMMM DD, YYYY")
        slug
        title
      }
    }
  }
`;
This is a simple example, but I hope you can see the power here.
We just covered the basics of the classic Static Site Generators.
Classic Static Site Generators are not without issues:
The latest Static Site Generators support more rendering methods than static pages to address these issues. GatsbyJS v4 supports the rendering option. The multiple rendering methods can be used in a single site, tailored to page requirements.
SSG: Static Site Generation These pages are generated in the build pipeline.
DSG: Deferred Static Generation Defers non-critical page generation until a user requests it. This allows the most essential pages to be instantly built and deployed to the edge.
SSR: Server Side Rendering Generate portions of the page on User request
GatsbyJS also supports:
Functions Build dynamic applications without running servers. Submit forms, authenticate users, securely connect to external services, build GraphQL/REST APIs, and more.
This is a class participation game. Below are some website types. We need to decide whether :
Here goes:
| Website Type | Should | Could |
|---|---|---|
| Blog | [ ] | [ ] |
| e-Commerce | [ ] | [ ] |
| Single Page Application | [ ] | [ ] |
| Amazon | [ ] | [ ] |
| Dashboard | [ ] | [ ] |
| Warehouse Manangement | [ ] | [ ] |
| Auction Site | [ ] | [ ] |
| e-Learning | [ ] | [ ] |
| Pintrest | [ ] | [ ] |
| Documentation | [ ] | [ ] |
Hints on what to do next:
Steps:
// src/index.js
import * as React from "react";
import {
    Link,
    graphql
} from "gatsby";
import {
    StaticImage
} from "gatsby-plugin-image";

import Layout from "../components/layout";
import Seo from "../components/seo";

const IndexPage = ({
        data
    }) => ( <
        Layout >
        <
        Seo title = "Home" / >
        <
        div >
        <
        StaticImage src = "../images/example.png"
        loading = "eager"
        width = {
            64
        }
        quality = {
            95
        }
        formats = {
            ["auto", "webp", "avif"]
        }
        alt = ""
        style = {
            {
                marginBottom: `var(--space-3)`
            }
        }
        /> <
        h1 >
        Welcome to my < b > Blog! < /b> < /
        h1 > <
        h2 > Pick a Blog, any blog < /h2> {
        data.allMarkdownRemark.nodes.map(({
            frontmatter
        }) => ( <
            >
            <
            Link className = "primary button"
            to = {
                frontmatter.slug
            } >
            <
            p > {
                frontmatter.title
            } < /p> < /
            Link > <
            />
        ))
    } <
    /div> < /
Layout >
);

/**
 * Head export to define metadata for the page
 *
 * See: https://www.gatsbyjs.com/docs/reference/built-in-components/gatsby-head/
 */
export const Head = () => < Seo title = "Home" / > ;

export default IndexPage;

export const pageQuery = graphql`
  query BlogsQuery {
    allMarkdownRemark {
      nodes {
        frontmatter {
          slug
          title
          date
        }
      }
    }
  }
`;npm install gatsby-plugin-material-ui @emotion/react @mui/material @emotion/styled// src/index.js
import * as React from "react";
import {
Link,
graphql
} from "gatsby";
import {
StaticImage
} from "gatsby-plugin-image";
import Rating from "@mui/material/Rating";
import Layout from "../components/layout";
import Seo from "../components/seo";
const IndexPage = ({
data
}) => ( <
Layout >
<
Seo title = "Home" / >
<
div >
<
StaticImage src = "../images/example.png"
loading = "eager"
width = {
64
}
quality = {
95
}
formats = {
["auto", "webp", "avif"]
}
alt = ""
style = {
{
marginBottom: `var(--space-3)`
}
}
/> <
h1 >
Welcome to my < b > Blog! < /b> < /
h1 > <
h2 > Pick a Blog, any blog < /h2> {
data.allMarkdownRemark.nodes.map(({
frontmatter
}) => ( <
>
<
Link className = "primary button"
to = {
frontmatter.slug
} >
<
p > {
frontmatter.title
} < /p> < /
Link > <
Rating name = "half-rating"
defaultValue = {
4.5
}
precision = {
0.5
}
/> < / >
))
} <
/div> < /
Layout >
);
/**
* Head export to define metadata for the page
*
* See: https://www.gatsbyjs.com/docs/reference/built-in-components/gatsby-head/
*/
export const Head = () => < Seo title = "Home" / > ;
export default IndexPage;
export const pageQuery = graphql`
query BlogsQuery {
allMarkdownRemark {
nodes {
frontmatter {
slug
title
date
}
}
}
}
`;