
A potential client recently asked me about document processing options. The client likes AWS and Javascript since the team has experience in these areas. The following is a set of small nodeJS apps to prove an architecture concept. This is all pretty standard stuff in AWS, nothing too exciting here.
The process flow could look something like this:
To make the flow work, we need to be able to do the following.
To get started, we will need to get some infrastructure out of the way. In the tutorial, let’s start with bare metal.
mkdir textract
cd textract
npm init -y
yarn add aws-sdk dotenv node-fetch prompt
git init
touch .env
touch .gitignore
touch awsConfig.js
.gitignore
.env
.DS_Store
node_modulesAt the AWS console, search for S3 and click the ‘Create Bucket’ button. Under ‘General Configuration, ’ name the bucket and choose a region. Use the name and region to complete the awsConfig.js file below.
awsConfig.js
module.exports = {
region: <Your region>,
bucket: <Your bucket name>,
apiVersion: '2018-06-27',
signatureVersion: 'v4',
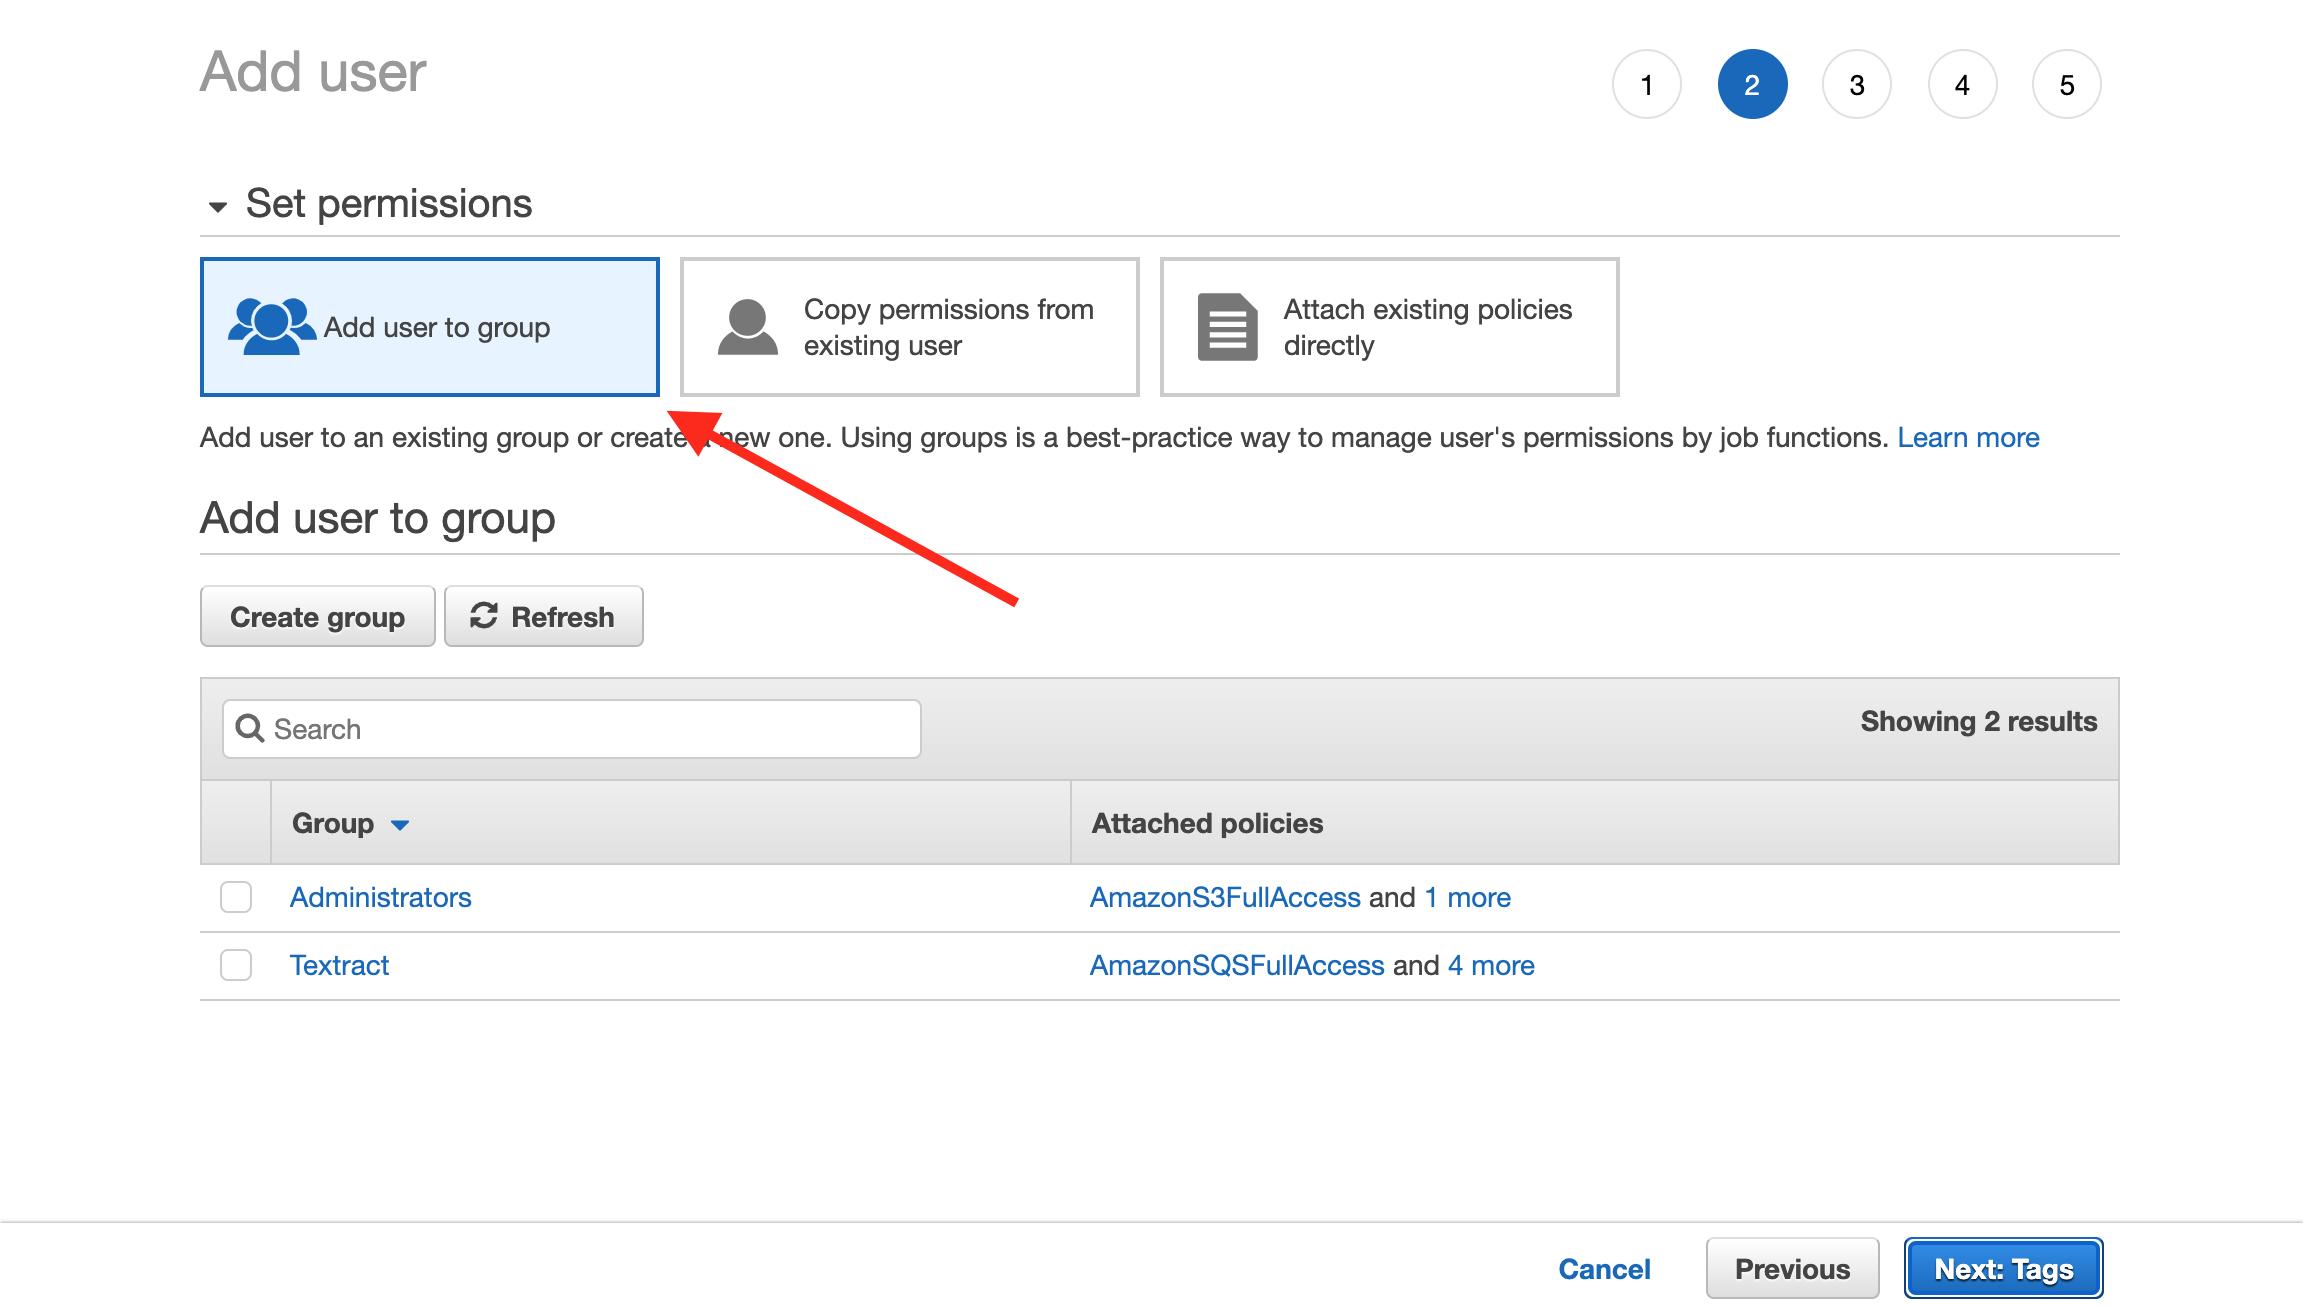
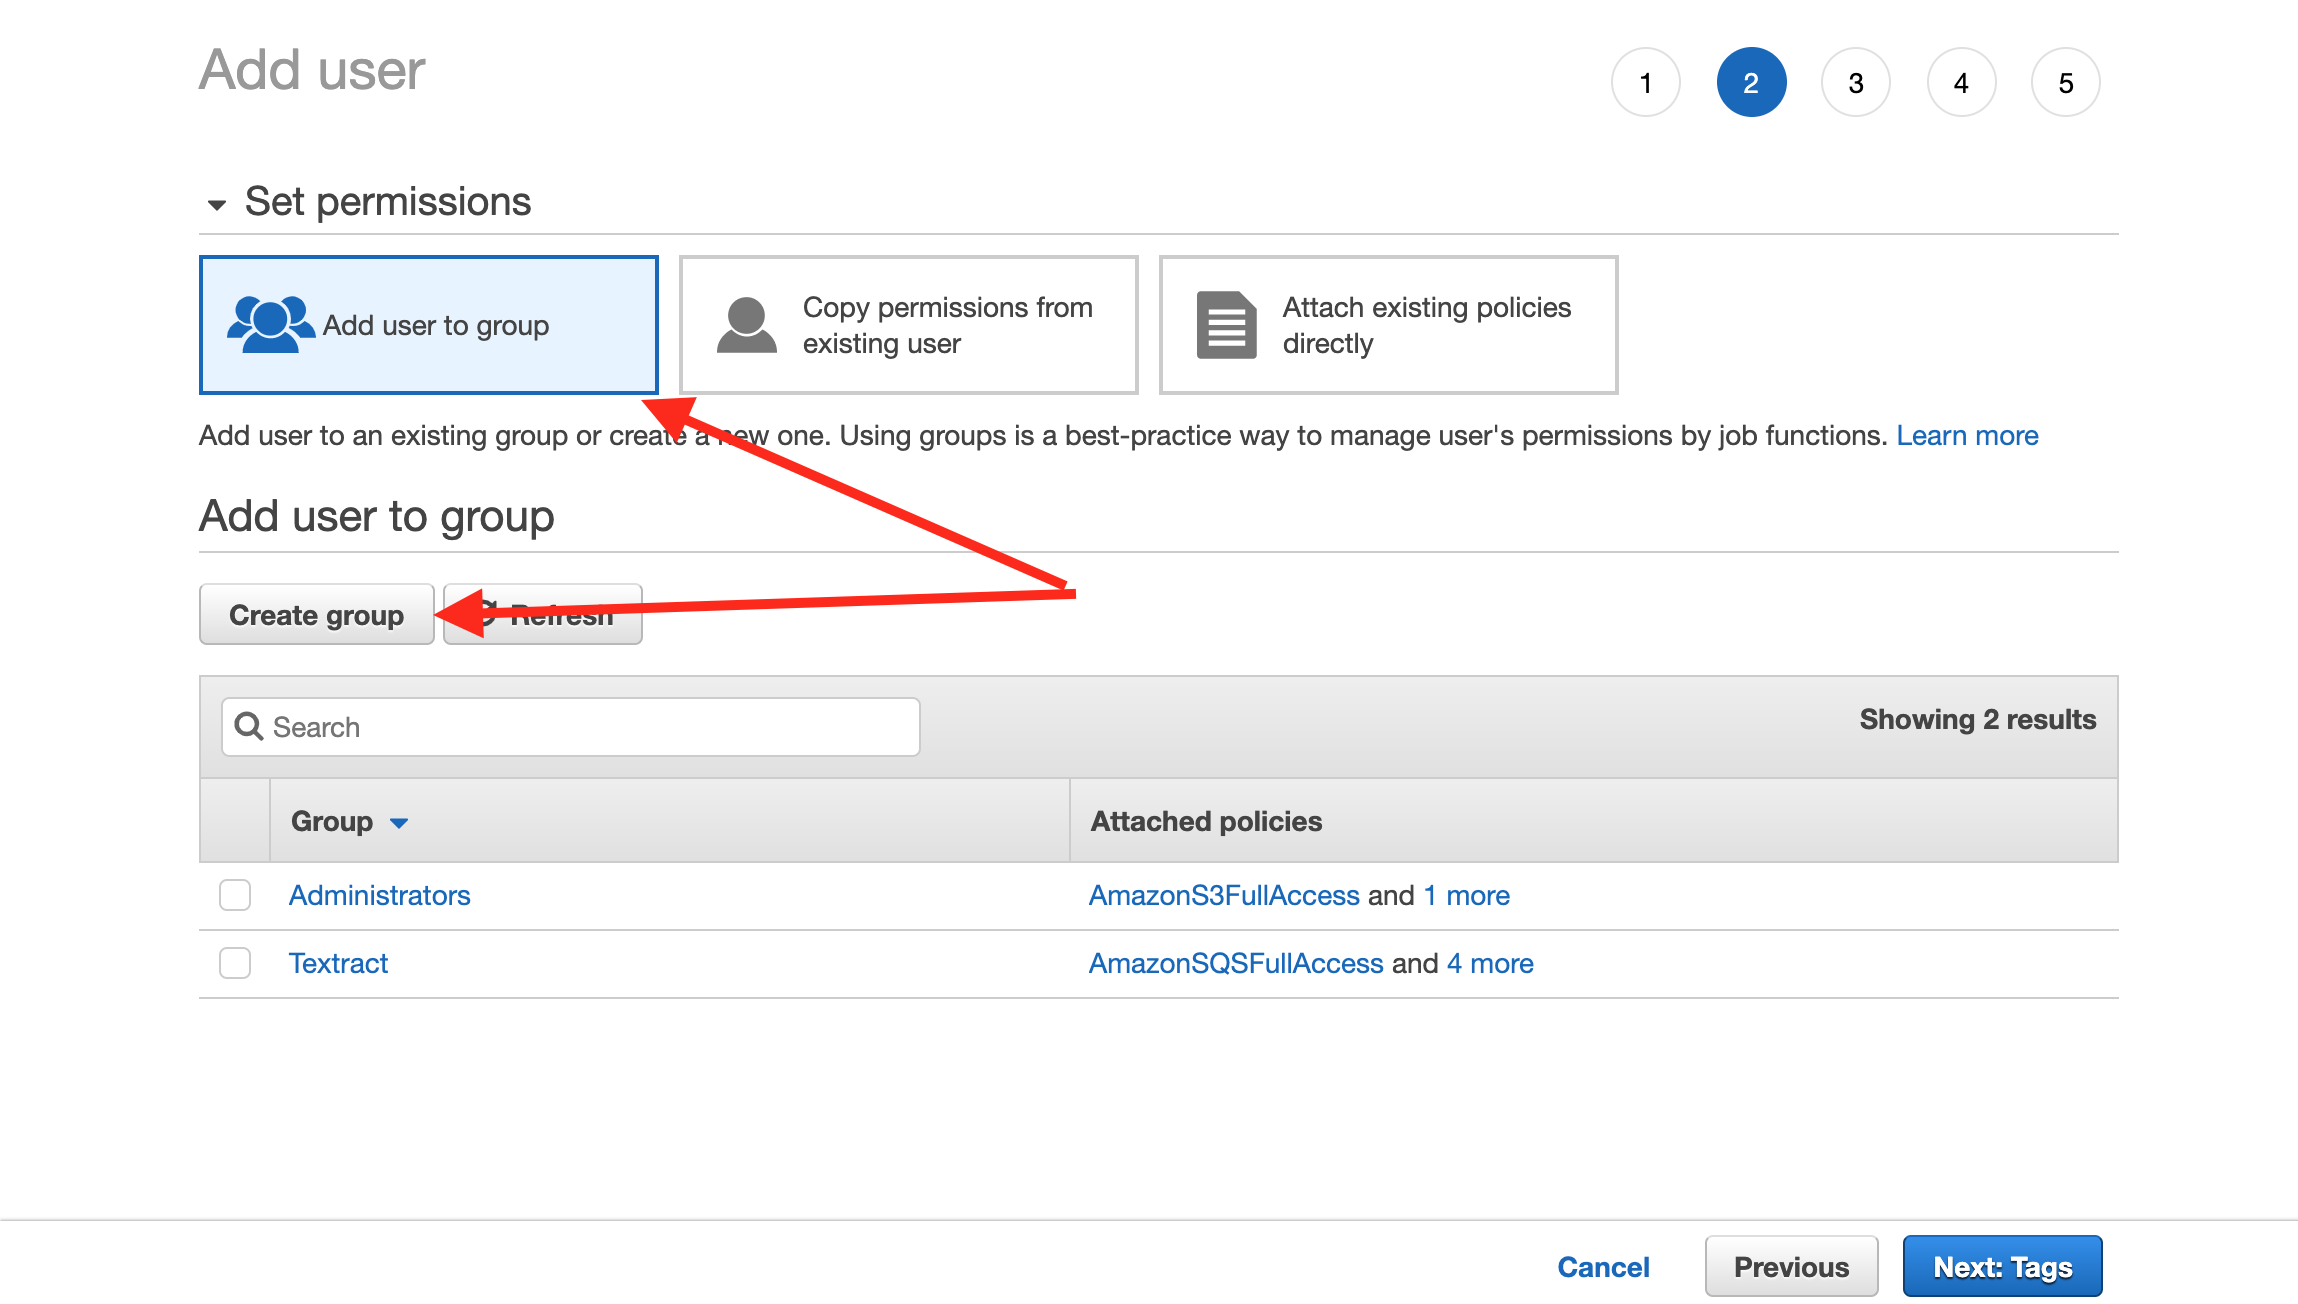
}At the AWS console, search for IAM and click ‘Users’ in the left menu. Then click ‘Add user’ under ‘General Configuration.’ Following are some screen shots that lead you through the Add User process.
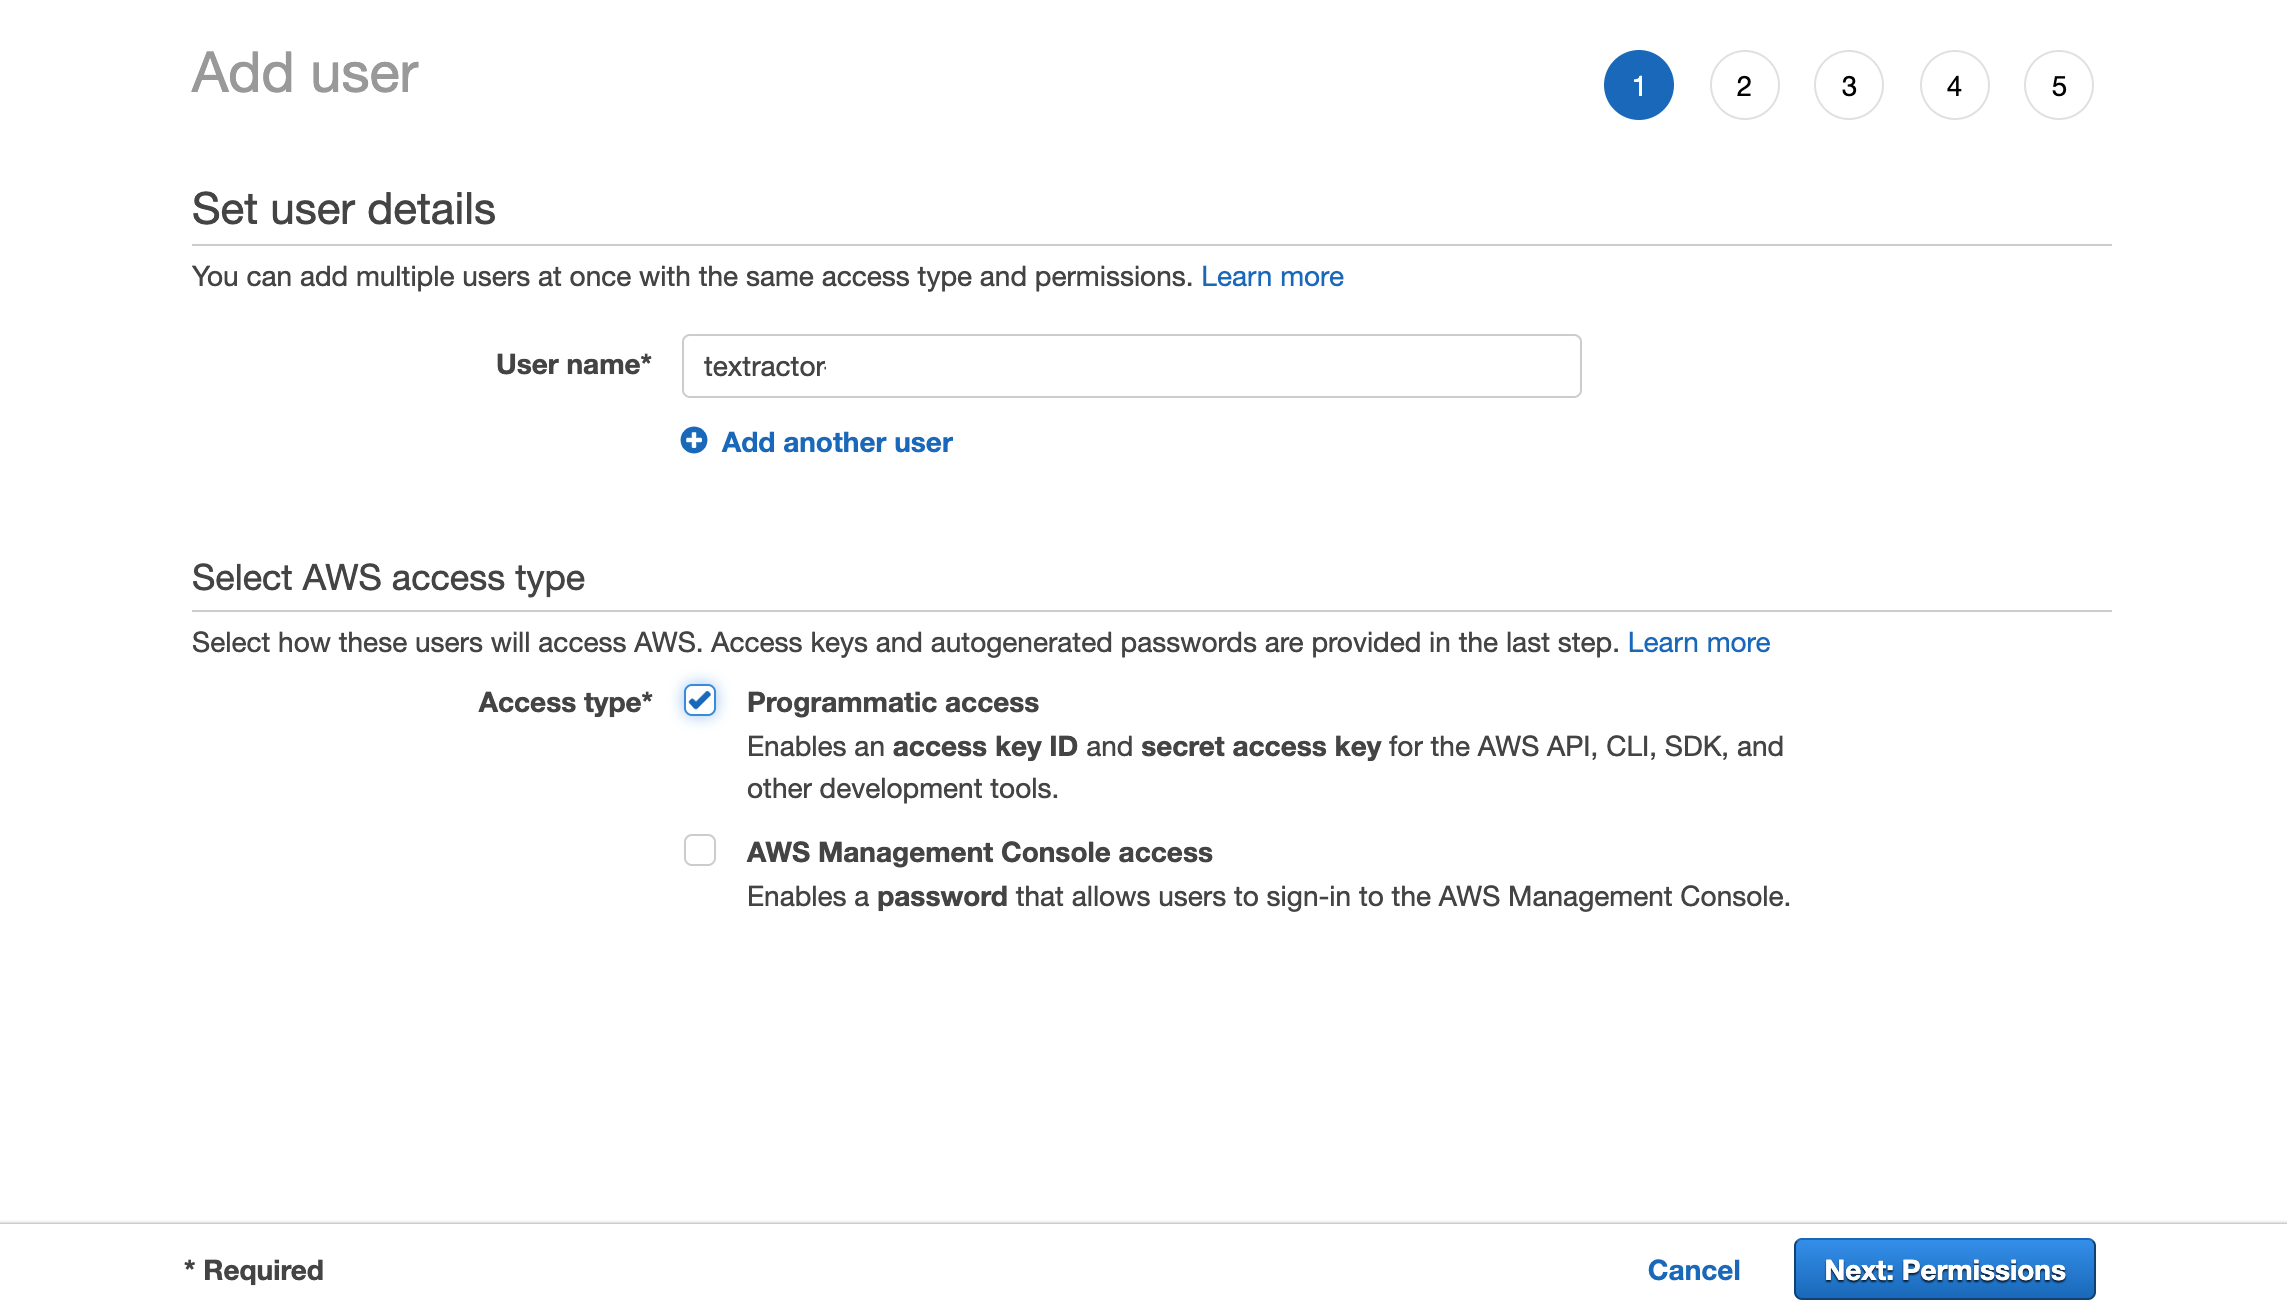

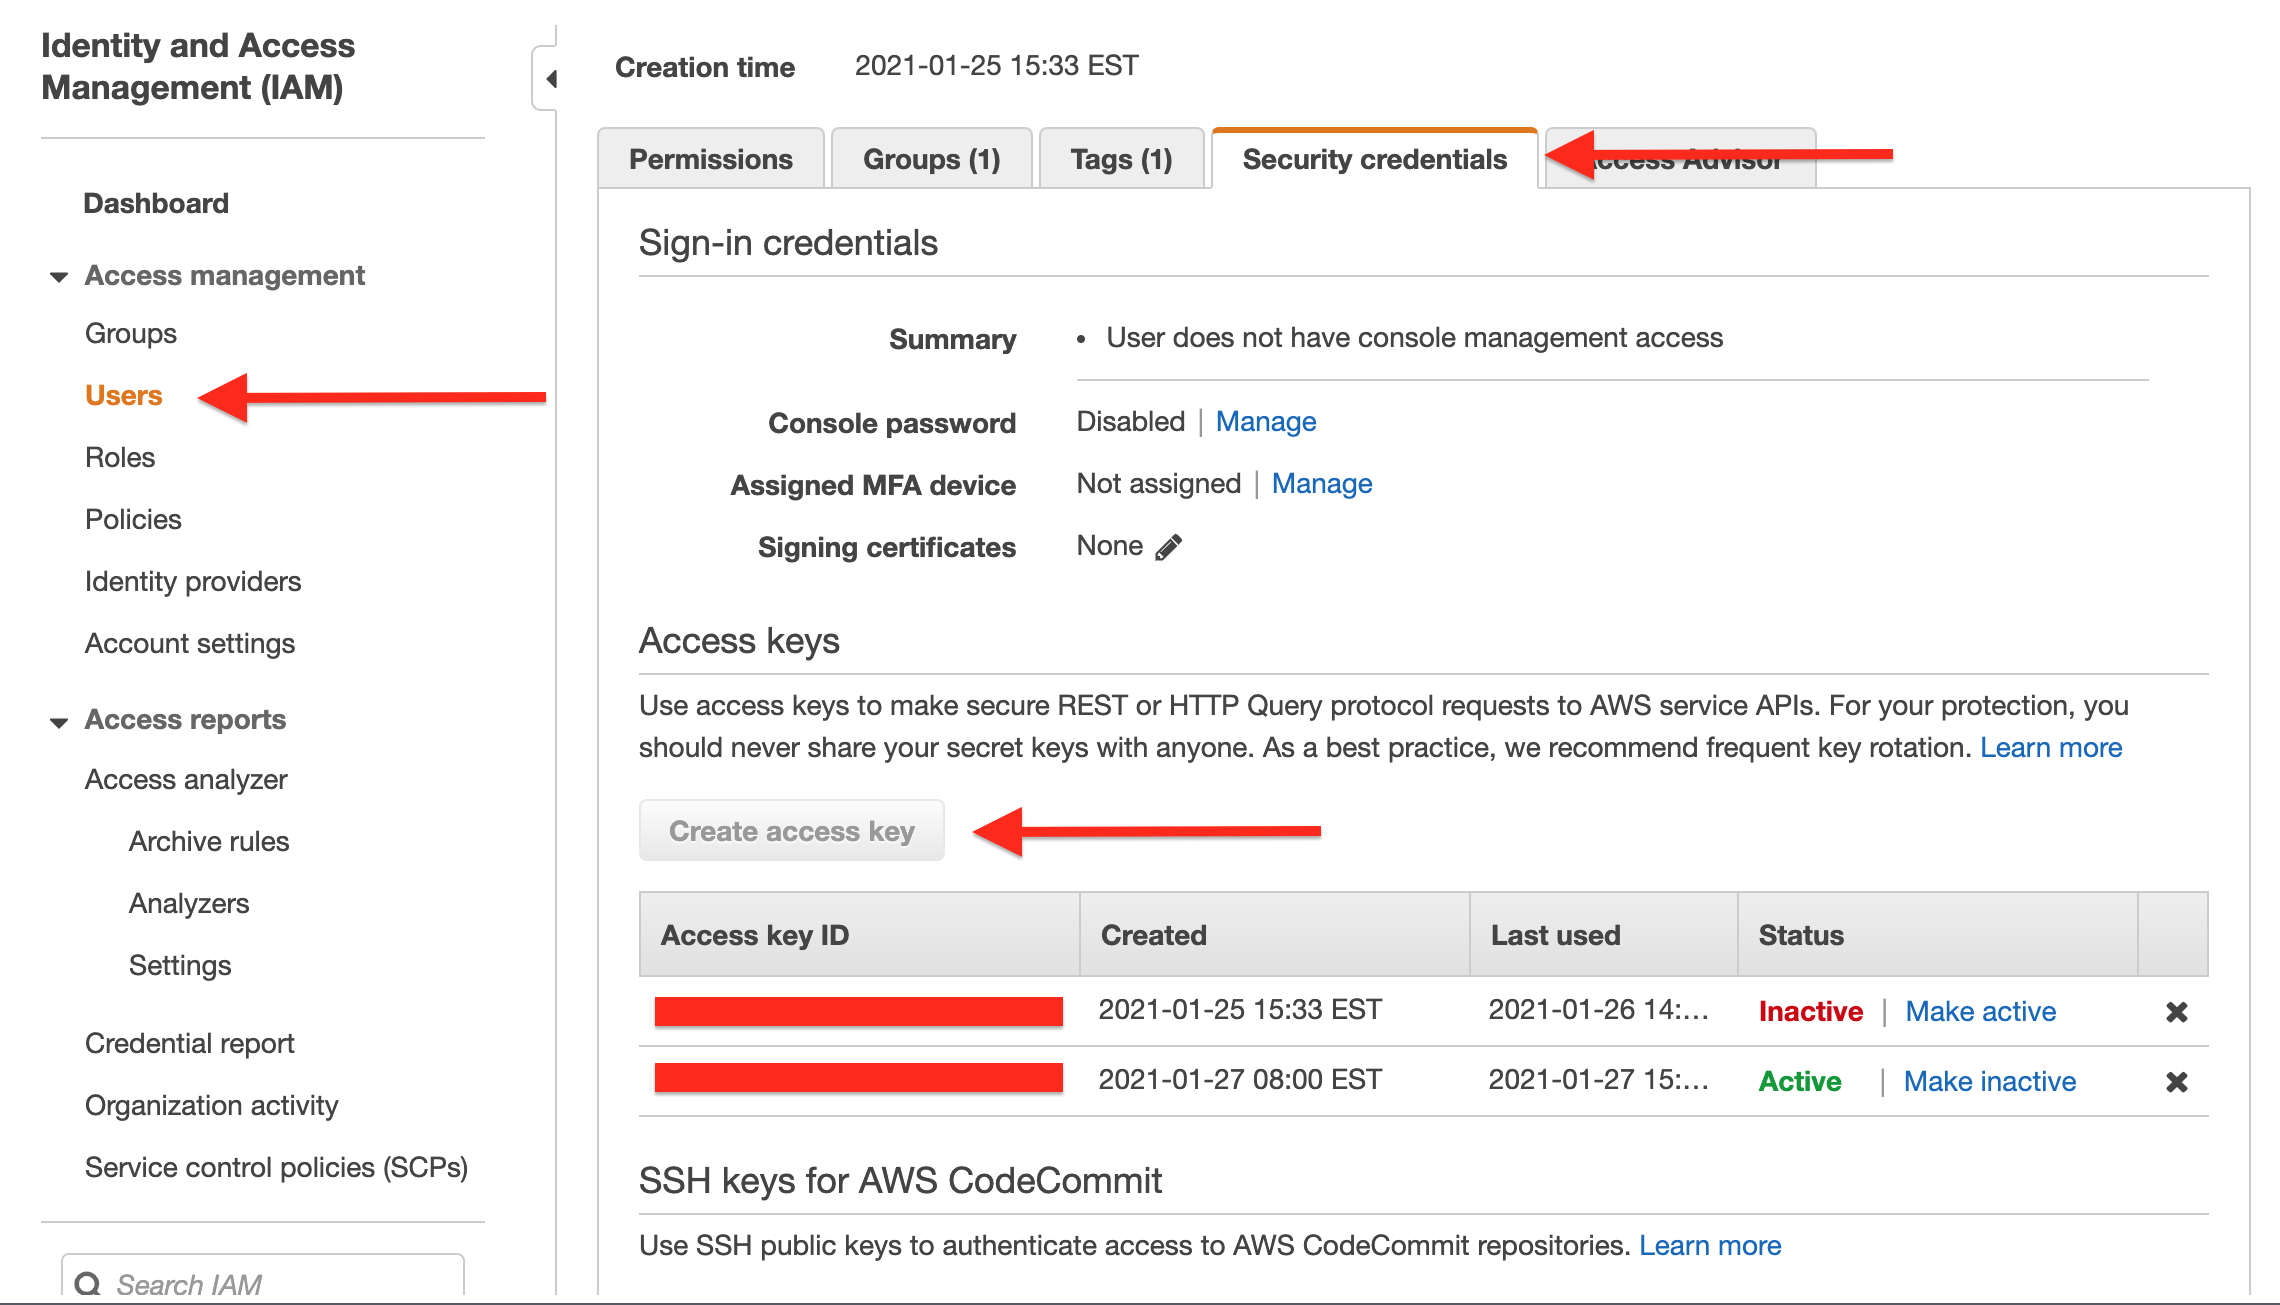
Copy the Access and Secret keys into the .env file
At the AWS console, search for SNS and click ‘Topics’ in the left menu. Click the ‘Create topic’ button, choose a ‘Standard Topic, and give it a name. Once created, the Topics list page (the page with the ‘Create topic’ button) will show our new topic with the ARN. Copy the ARN into .env under SNS_TOPIC_ARN.
Finally, we need a role for Textraction to access SNS. At the AWS console, search for IAM and click ‘Roles’ in the left menu. Click the ‘Create role’ button. Choose the ‘type of trusted entity’ to be AWS service, then select Textraction from the option. Complete the remaining steps and get back to the Roles list page. Click the new Textract role to get to the detail page where you can copy the ‘Role ARN’ into .env under ARN_ROLE
.env
ACCESS_KEY=
SECRET_KEY=
ARN_ROLE=
SNS_TOPIC_ARN=Let’s try to use a pre-signed link. You might want to use a pre-signed link from a browser client, so you don’t need to share your AWS credentials. If you are running on a server or in a Lambda, you can get the document directly.
Upload a document to the S3 bucket you just created using the console.
get-presigned.js
'use strict'
require('dotenv').config()
const fetch = require('node-fetch')
const AWS = require('aws-sdk')
const {
    region,
    bucket,
    signatureVersion
} = require('./awsConfig')
const accessKeyId = process.env.ACCESS_KEY
const secretAccessKey = process.env.SECRET_KEY

AWS.config.update({
    region,
    signatureVersion
})
const s3 = new AWS.S3({
    accessKeyId,
    secretAccessKey,
})

var params = {
    Bucket: bucket,
    Key: '<Your document>',
    Expires: 60,
}
var url = s3.getSignedUrl('getObject', params)
console.log('The URL is', url) // expires in 60 seconds
fetch(url)
    .then((res) => res.text())
.then((body) => console.log(body))node get-presigned.jsFor this example, I will write some text into the document. A bunch of the code is used to prompt inputs and is unnecessary for the concept but makes it easier to test.
put.js
'use strict'
require('dotenv').config()
const AWS = require('aws-sdk')
const prompt = require('prompt')

prompt.start()
prompt.get(
    [{
            name: 'filename',
            description: "Enter a file name to be created in S3 like 'test.txt'",
        },
        {
            name: 'contents',
            description: "Enter some contents for the file like 'Hello World'",
        },
    ],
    function(err, result) {
        if (err) {
            return onErr(err)
        }
        upload(
            result.filename ? result.filename : 'test.txt',
            result.contents ? 'result.contents' : 'Hello World'
        )
    }
)

function onErr(err) {
    console.log(err)
    return 1
}

const upload = (filename, contents) => {
    const accessKeyId = process.env.ACCESS_KEY
    const secretAccessKey = process.env.SECRET_KEY
    const region = process.env.REGION
    const bucket = process.env.Bucket

    AWS.config.update({
        region,
        signatureVersion: 'v4'
    })
    const s3 = new AWS.S3({
        accessKeyId,
        secretAccessKey,
    })

    var params = {
        Bucket: bucket,
        Key: filename,
        Body: contents,
        ContentDisposition: `filename="${filename}"`,
    }
    s3.putObject(params, function(err, data) {
        if (err) {
            console.log('--- [ERROR] - Caching Failed')
            console.log(err, err.stack) // an error occurred
        } else {
            console.log('--- File Cached')
            console.log(data) // successful response
        }
    })
}node putLet’s fire off an asynchronous call to AWS Textraction to process a PDF form. Upload a Form PDF into our S3 bucket so we can test with it. The app will return a JobId. You can watch SQS for the completion event message. It should complete in seconds.
textract-start-notify.js
'use strict'
require('dotenv').config()
const AWS = require('aws-sdk')
const {
    region,
    bucket,
    apiVersion,
    signatureVersion
} = require('./awsConfig')

console.log('in upload')
const accessKeyId = process.env.ACCESS_KEY
const secretAccessKey = process.env.SECRET_KEY
const arnRole = process.env.ARN_ROLE
const snsTopicArn = process.env.SNS_TOPIC_ARN

AWS.config.update({
    region,
    signatureVersion
})
const textract = new AWS.Textract({
    accessKeyId,
    secretAccessKey,
    apiVersion,
})

var params = {
    DocumentLocation: {
        S3Object: {
            Bucket: bucket,
            Name: '<Your PDF document name>',
        },
    },
    NotificationChannel: {
        RoleArn: arnRole,
        SNSTopicArn: snsTopicArn,
    },
    FeatureTypes: ['FORMS'],
    OutputConfig: {
        S3Bucket: bucket,
        S3Prefix: 'textract',
    },
}

textract.startDocumentAnalysis(params, function(err, data) {
    if (err) console.log(err, err.stack)
    // an error occurred
    else console.log(data) // successful response
})node textract-start-notifyNow that Textract completed we can parse the results. There is lots of information that we could display, including the location information within the PDF. We could use this if we wanted to draw boxes around it. In this example, I will list the form field labels and values.
textract-analyze.js
//@ts-check

'use strict'
require('dotenv').config()
const AWS = require('aws-sdk')
const {
    findFields
} = require('./textract-process')
const {
    region,
    apiVersion,
    signatureVersion
} = require('./awsConfig')

const accessKeyId = process.env.ACCESS_KEY
const secretAccessKey = process.env.SECRET_KEY

AWS.config.update({
    region,
    signatureVersion
})
const textract = new AWS.Textract({
    accessKeyId,
    secretAccessKey,
    apiVersion,
})

const params = {
    JobId: < YOUR JOB ID > ,
}
textract.getDocumentAnalysis(params, function(err, data) {
    if (err) console.log(err, err.stack)
    // an error occurred
    else {
        const fields = findFields(data)
        console.table(fields)
    }
})
The ‘findFields’ function looks like this.
textract-process.js
//@ts-nocheck
'use strict'
/**
 *
 * @param {*} parsedKeyValues
 * @param {*} childIds
 * @returns {string}
 */
const parseChild = (parsedKeyValues, childIds) => {
    return childIds.map((childId) => parsedKeyValues.words[childId]).join(' ')
}
/**
 *
 * @param {*} parsedKeyValues
 * @param {*} relationships
 * @returns {string}
 */
const parseChildRelationship = (parsedKeyValues, relationships) => {
    const result = []
    relationships.forEach((relationship) => {
        if (relationship.Type === 'CHILD') {
            result.push(parseChild(parsedKeyValues, relationship.Ids))
        }
    })
    return result.join(' ')
}

const parseValue = (parsedKeyValues, valueIds) => {
    return valueIds.map((valueId) => {
        const valueObject = parsedKeyValues.values[valueId]
        return parseChildRelationship(parsedKeyValues, valueObject)
    })
}

/**
 *
 * @param {*} textract
 * @returns {{keys: {Id: string, Relationships: [any]}, values: any, words: any}}
 */
const buildDictionary = (textract) => {
    return textract.Blocks.reduce(
        (acc, currentValue) => {
            if (currentValue.BlockType === 'WORD') {
                acc.words[currentValue.Id] = currentValue.Text
            }
            if (currentValue.BlockType === 'KEY_VALUE_SET') {
                if (currentValue.EntityTypes.indexOf('KEY') > -1) {
                    acc.keys.push({
                        Id: currentValue.Id,
                        Relationships: currentValue.Relationships,
                    })
                }
                if (currentValue.EntityTypes.indexOf('VALUE') > -1) {
                    acc.values[currentValue.Id] = currentValue.Relationships
                }
            }
            return acc
        }, {
            keys: [],
            values: {},
            words: {}
        }
    )
}

/**
 *
 * @param {*} textract
 * @returns {[fieldName: string, values: [string] ]}
 */
const findFields = (textract) => {
    const parsedKeyValues = buildDictionary(textract)
    return parsedKeyValues.keys.reduce((acc, currentKey) => {
        if (currentKey.Relationships.length != 2) {
            console.error(`Unable to locate key and value for set ${currentKey.Id}`)
            return acc
        }
        const field = {
            fieldName: '',
            values: ''
        }
        currentKey.Relationships.forEach((r) => {
            if (r.Type === 'VALUE') {
                field.values = parseValue(parsedKeyValues, r.Ids)
            }
            if (r.Type === 'CHILD') {
                field.fieldName = parseChild(parsedKeyValues, r.Ids)
            }
        })
        acc.push(field)
        return acc
    }, [])
}

exports.findFields = findFieldsnode textract-analyze