
I had to hunt for this solution, so while it’s easy to implement, finding the correct incantation is not. Reference my previous post on setting up Gatsby with Auth0 for a complete solution. https://jameskolean.tech/post/2019-08-27-gatsbyjs-authentication-with-auth0/
Hasura has several ways to do Authentication and Authorization. You can find the documentation here https://hasura.io/docs/1.0/graphql/manual/auth/authentication/index.html.
We want to use a JWT (JSON Web Token) provided by Auth0. To make this happen, we need Auth0 to add some extra information to the JWT. We do this with Auth0 Rules. Go to the Dashboard and choose Rules on the lefthand menu. Create a new Rule with any name that makes sense and paste in this code.
function(user, context, callback) {
    const assignedRoles = (context.authorization || {}).roles;
    const namespace = "https://hasura.io/jwt/claims";
    context.idToken[namespace] = {
        'x-hasura-default-role': 'user',
        'x-hasura-allowed-roles': assignedRoles,
        'x-hasura-user-id': user.user_id
    };
    callback(null, user, context);
}
Note: When we make the GraphQL call to Hasura, we need to provide a user role that the the query will be executed as. This needs to be one of the assigned roles. If we don’t specify a Role the the Role will default to ‘user’,
Go to the Auth0 Dashboard and choose Users & Roles > Roles on the lefthand menu. Create a new test Role here. Now go to Users & Roles > Users and add the new Role to a user.
To test, all we need to do is log into the Gatsby and print out the JWT. Copy the JWT and paste it into https://jwt.io/ to decode it and see the additional fields.
Now you can set up Hasura table permissions using the new Role.
You need to crate a HASURA_GRAPHQL_JWT_SECRET and add it to our environmental varaibles in Heroku. Use this like to create the secret.
Now add the environmental variable. Go to the Settings tab and click ‘Receal Config Vars’.
You can also add an HASURA_GRAPHQL_ADMIN_SECRET to override the Admin Console authentication.
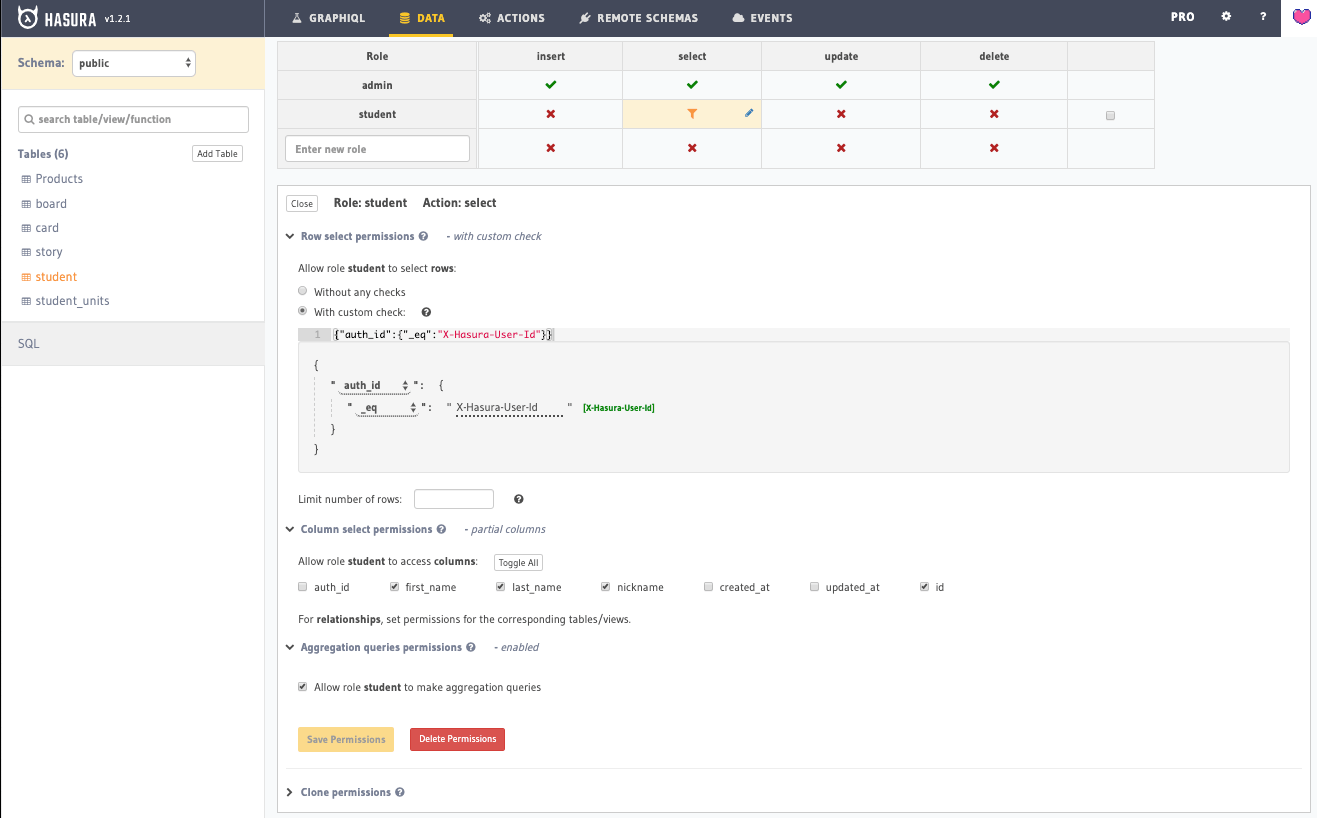
You can set the table permissions like this.
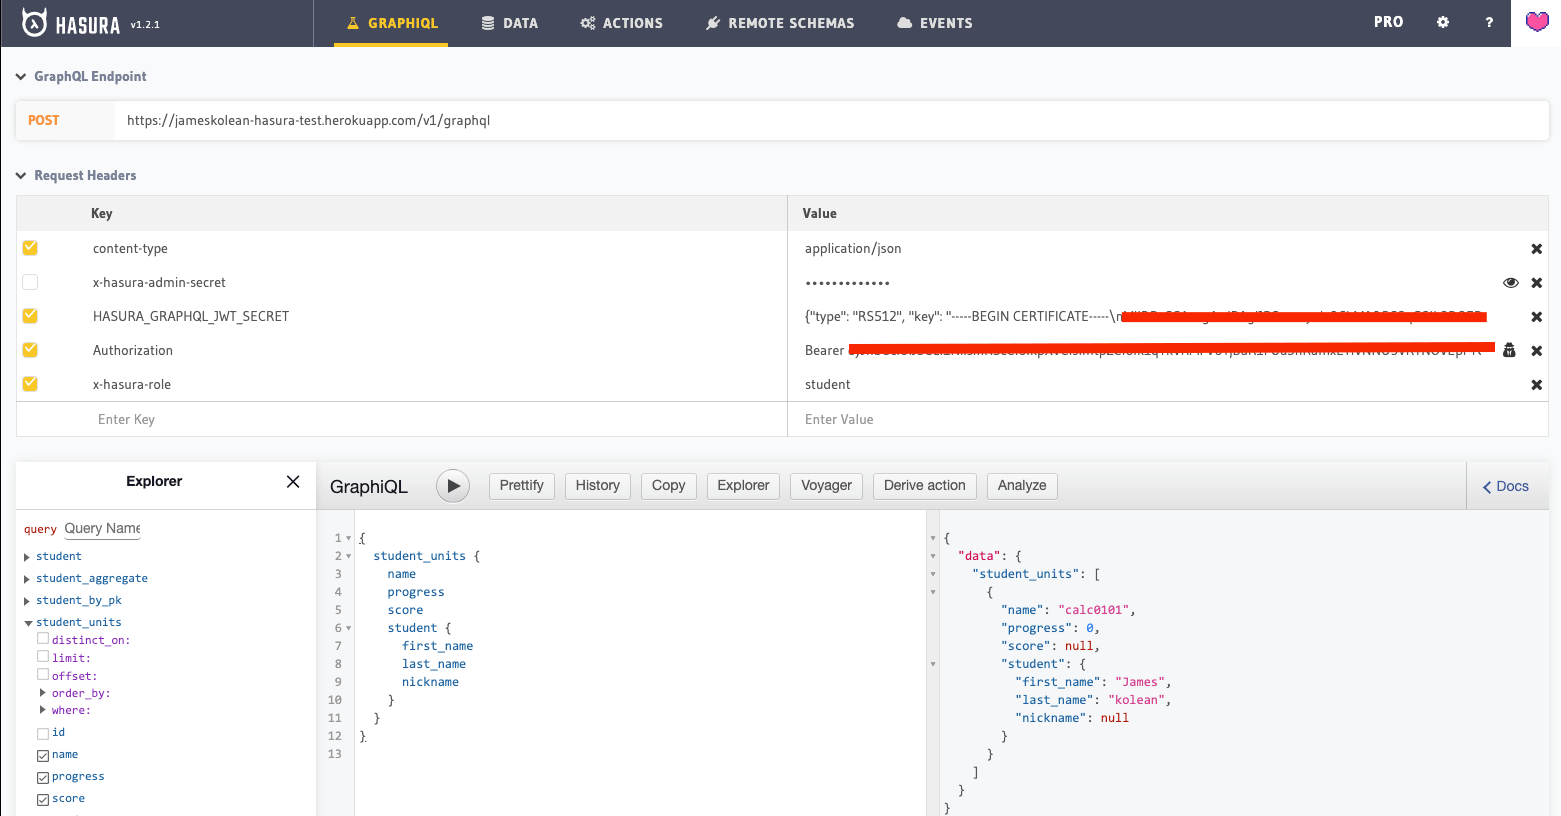
Use these headers to test the GrqphQL.
Calling from the Apollo client would look sonething like this.
import React from 'react'
import {
    ApolloProvider
} from '@apollo/react-hooks'
import ApolloClient from 'apollo-boost'
import fetch from 'isomorphic-fetch'

import {
    getIdToken,
    getProfile
} from './auth'

const client = new ApolloClient({
    uri: process.env.GATSBY_HASURA_URL,
    fetch,
    request: (operation) => {
        const token = getIdToken()
        const profile = getProfile()
        console.log('set auth to ', profile)
        operation.setContext({
            headers: {
                authorization: token ? `Bearer ${token}` : '',
                'x-hasura-role': profile ? profile.role : '',
            },
        })
    },
})

const ApolloRootElementWrapper = ({
    element
}) => ( <
    ApolloProvider client = {
        client
    } > {
        element
    } < /ApolloProvider>
)

export default ApolloRootElementWrapper